Why You’ll Love This Recipe
Magical Candy Cane Cookies are the quintessential holiday treat—whimsical, colorful, buttery, and lightly kissed with peppermint. These cookies offer that perfect blend of nostalgic flavor and cheerful presentation, making them a favorite for cookie exchanges, Christmas parties, and cozy winter baking days. The dough twists into charming candy cane shapes that look impressive yet are surprisingly simple to form. I once added a touch of vanilla alongside the peppermint, and the combination made the cookies taste even more enchanting without overwhelming the classic flavor. Soft on the inside with a slight crunch on the edges, these cookies embody the spirit of the season. Whether enjoyed with hot cocoa, gifted to friends, or displayed on a festive cookie platter, they bring magic and holiday joy to every bite.
Print
Magical Candy Cane Cookies Recipe: Festive, Fun, and Perfect for Holiday Baking
- Total Time: 30 mins
- Yield: 24 cookies
- Diet: Vegetarian
Description
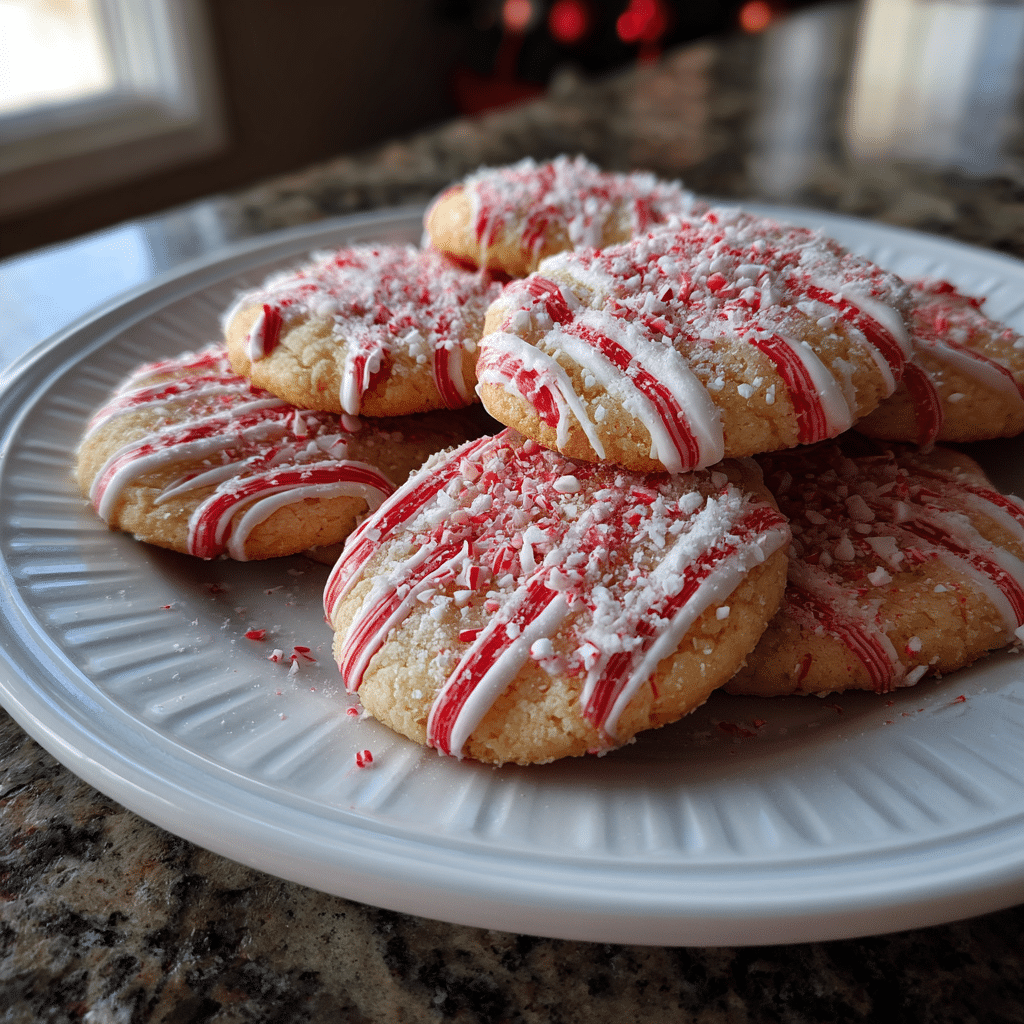
Festive candy cane–shaped cookies made with buttery dough tinted red and twisted together, finished with a sweet peppermint sugar topping.
Ingredients
- 1 cup unsalted butter, softened
- 1 cup powdered sugar
- 1 large egg
- 1 1/2 tsp almond extract
- 1 tsp vanilla extract
- 2 1/2 cups all-purpose flour
- 1/2 tsp salt
- Red food coloring
- 1/4 cup crushed candy canes
- 2 tbsp granulated sugar
Instructions
- Preheat oven to 375°F (190°C). Line baking sheets with parchment paper.
- Cream together butter and powdered sugar until light and fluffy.
- Beat in egg, almond extract, and vanilla extract.
- In a separate bowl, whisk flour and salt, then add gradually to the wet ingredients to form a soft dough.
- Divide the dough in half; tint one half with red food coloring.
- Roll a small portion of each dough into ropes about 4–5 inches long, then twist together to form a candy cane shape.
- Place on prepared baking sheets, spacing evenly.
- Mix crushed candy canes and granulated sugar; sprinkle over cookies.
- Bake for 8–10 minutes or until set but not browned.
- Cool completely on a wire rack.
Notes
- Chill dough for 20 minutes if too soft to shape.
- Use gel food coloring for vibrant red color.
- Store cookies in an airtight container to keep them crisp.
- Prep Time: 20 mins
- Cook Time: 10 mins
- Category: Dessert
- Method: Baking
- Cuisine: American
Ingredients
(Tip: You can find the complete list of ingredients and their measurements in the recipe card below.)
Unsalted butter
Butter creates a rich, tender cookie dough with classic holiday flavor.
Granulated sugar
Sugar provides sweetness and helps the cookies achieve a delicate crispness at the edges.
Egg
Egg binds the dough and contributes to its soft texture.
Vanilla extract
Vanilla adds warmth and enhances the buttery base.
Peppermint extract
This creates the signature candy cane flavor—cool, refreshing, and festive.
All-purpose flour
Flour provides structure and helps the cookies hold their candy cane shape.
Baking powder
A small amount of leavening keeps the cookies light and tender.
Salt
A pinch of salt balances the sweetness and sharpens the peppermint flavor.
Red food coloring
Used to tint half the dough and create the iconic candy cane stripes.
Directions
Begin by creaming the butter and sugar together in a large bowl until light and fluffy. Add the egg, vanilla extract, and peppermint extract, mixing until smooth.
In a separate bowl, whisk together the flour, baking powder, and salt. Gradually add the dry ingredients to the butter mixture, mixing until a soft dough forms.
Divide the dough into two equal portions. Leave one portion plain and tint the other with red food coloring, kneading gently until the color is evenly distributed. Wrap both portions in plastic wrap and chill for 30 minutes.
Preheat your oven to 350°F and line two baking sheets with parchment paper. Remove the dough from the fridge. Roll a teaspoon-sized piece of each color into thin ropes, about 5 inches long. Place one red rope and one plain rope side by side, gently twist them together, and curve the top to form a candy cane shape.
Place the shaped cookies onto the prepared baking sheets, spacing them slightly apart. Bake for 8–10 minutes, or until set but not browned. Cool on the sheets briefly before transferring to a wire rack.
Equipment needed
Must-Have Tools to Get Rolling
Here’s what you’ll want to have on hand:
Silicone Spatula – Durable, heat-resistant silicone spatula perfect for mixing, scraping, and spreading. Gentle on non-stick cookware and easy to clean.
Large pot – You’ll need this to boil the whole cabbage head and soften the leaves.
large bowl –Spacious, durable large bowl ideal for mixing, serving, or food preparation. Made from sturdy material and easy to clean.
Sharp knife – For coring the cabbage and slicing out the thick stem in each leaf. A paring knife works best.
Mixing bowl – A big bowl makes it easier to combine your meat and rice filling evenly.
Cutting board – For prepping cabbage leaves and rolling them like a pro.
9×13-inch baking dish – Ideal size to fit your rolled cabbage leaves snugly and prevent them from unraveling.
knife – A sharp, durable kitchen knife perfect for slicing, chopping, and dicing with ease.
Servings and timing
This recipe yields about 24 candy cane cookies. Preparation takes around 20 minutes, chilling takes 30 minutes, and baking requires 8–10 minutes per batch. Total estimated time: approximately 1 hour.
Storage/reheating
Store the cookies in an airtight container at room temperature for up to one week. They can also be frozen for up to two months—just place parchment between layers to prevent sticking. Thaw at room temperature before serving. No reheating is needed.

Variations and Customizations
Sparkling Sugar Finish
Sprinkle cookies with coarse sugar before baking for extra sparkle.
Chocolate-Dipped Candy Canes
Dip cooled cookie ends in melted chocolate for a decadent twist.
Swirled Dough Effect
Instead of twisting ropes, gently knead the two colors together for a marbled look.
Almond Peppermint Version
Add a drop of almond extract for a bakery-style flavor.
Mint Chocolate Chip Candy Cane Cookies
Fold mini chocolate chips into the red dough for texture.
White Chocolate Drizzle
Drizzle white chocolate over cooled cookies for a festive finish.
Extra Peppermint Crunch
Sprinkle crushed candy canes over the cookies before baking.
Gluten-Free Option
Use a cup-for-cup gluten-free flour blend.
Soft Holiday Snow Cookies
Skip the shaping and bake as simple round cookies, dusted with powdered sugar.
Double Vanilla Version
Reduce peppermint slightly and add more vanilla for a softer, more classic sugar cookie profile.
FAQs
Do I need to chill the dough?
Yes—chilling makes shaping easier and helps the cookies keep their shape.
Can I use gel food coloring?
Gel works wonderfully and provides vibrant color without thinning the dough.
Why are my cookies spreading?
The dough may be too warm; chill longer before shaping.
Can I make the dough ahead of time?
Yes—refrigerate for up to 48 hours or freeze for later.
Can I omit peppermint extract?
Yes—replace it with more vanilla or almond extract.
Why did my ropes break while twisting?
They may be too cold; let the dough sit a few minutes before shaping.
Can I make smaller or larger cookies?
Yes—adjust the baking time accordingly.
Should the cookies brown?
No—remove them before browning to keep them soft.
Can I add cocoa to the dough?
Yes, replace a small amount of flour with cocoa for chocolate candy cane cookies.
Do these ship well for gifts?
Yes—pack carefully and use parchment to separate layers.
Conclusion
Magical Candy Cane Cookies are a festive, eye-catching holiday treat that delivers classic peppermint flavor and brilliant color in every bite. They’re fun to make, even more fun to share, and add a whimsical touch to holiday cookie trays. With their soft texture, nostalgic aroma, and endless customization options, these cookies are sure to become a cherished part of your seasonal baking tradition. Enjoy creating them, serving them, and spreading holiday magic one candy cane cookie at a time.
Hungry for more? Visit our website for full recipes and follow us on Pinterest for daily foodie inspo you’ll love to pin!