Why You’ll Love This Recipe
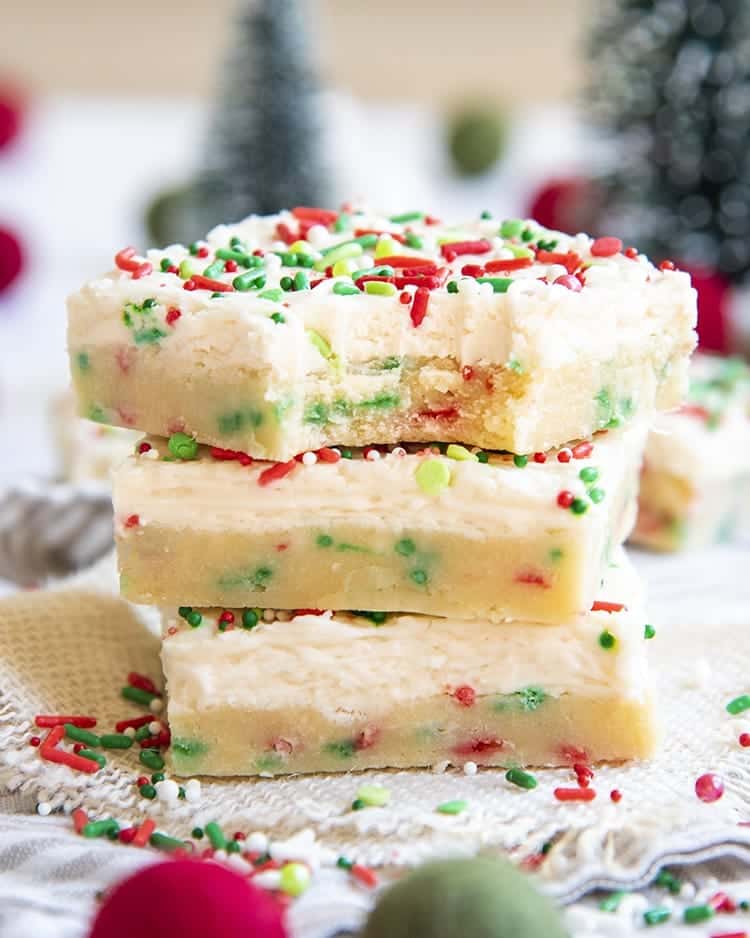
Christmas Cookie Bars are everything we love about holiday cookies, but with far less effort and just as much charm. I started making these during busy holiday seasons when time was limited, but I still wanted something homemade and festive to share with family and friends. These bars deliver soft, chewy centers, lightly crisp edges, and plenty of holiday flavor in every bite. Instead of scooping and baking multiple trays of cookies, everything comes together in one pan, making this recipe ideal for holiday baking marathons. The dough is rich, buttery, and perfectly sweet, while the colorful toppings make them feel instantly celebratory. They are great for cookie exchanges, dessert trays, or cozy evenings with a warm drink. Simple, reliable, and crowd-pleasing, these cookie bars are a holiday staple you will come back to year after year.
Print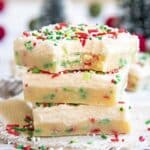
Christmas Cookie Bars (Soft, Festive, and Perfect for Sharing)
- Total Time: 45 minutes
- Yield: 16 bars
- Diet: Vegetarian
Description
Festive Christmas cookie bars that are soft, buttery, and loaded with holiday sprinkles and chocolate chips—easy to make and perfect for sharing during the holidays.
Ingredients
- 1 cup unsalted butter, softened
- 1 cup granulated sugar
- 1/2 cup brown sugar, packed
- 2 large eggs
- 2 tsp vanilla extract
- 2 1/2 cups all-purpose flour
- 1 tsp baking powder
- 1/2 tsp baking soda
- 1/2 tsp salt
- 1 cup red and green holiday sprinkles
- 1 cup chocolate chips (white, milk, or semi-sweet)
Instructions
- Preheat oven to 180°C (350°F) and line a 9×13-inch baking pan with parchment paper.
- In a large bowl, cream together butter, granulated sugar, and brown sugar until light and fluffy.
- Beat in eggs one at a time, then mix in vanilla extract.
- In a separate bowl, whisk together flour, baking powder, baking soda, and salt.
- Gradually add dry ingredients to wet ingredients until just combined.
- Fold in sprinkles and chocolate chips.
- Spread dough evenly into prepared pan.
- Bake for 25–30 minutes, or until edges are lightly golden and center is set.
- Cool completely before slicing into bars.
Notes
- Do not overbake—slightly underbaked bars stay soft and chewy.
- Swap sprinkles for chopped candy canes for a minty twist.
- Store in an airtight container for up to 5 days.
- Prep Time: 15 minutes
- Cook Time: 30 minutes
- Category: Dessert
- Method: Baking
- Cuisine: American
Ingredients
(Tip: You can find the complete list of ingredients and their measurements in the recipe card below.)
Unsalted butter
Butter forms the rich foundation of the bars, providing moisture and that classic cookie flavor.
Granulated sugar
Granulated sugar adds sweetness and helps create lightly crisp edges.
Brown sugar
Brown sugar contributes moisture and a deeper, caramel-like flavor that keeps the bars soft.
Eggs
Eggs bind the ingredients together and give structure while keeping the texture tender.
Vanilla extract
Vanilla enhances all the other flavors and adds warmth to the dough.
All-purpose flour
Flour provides structure and stability, ensuring the bars slice cleanly once baked.
Baking powder
Baking powder gives the bars a gentle lift, preventing them from becoming dense.
Salt
Salt balances the sweetness and enhances the buttery flavor.
Red and green sprinkles
Sprinkles add festive color and a cheerful holiday look.
White chocolate chips
White chocolate chips melt into the dough, adding sweetness and creaminess.
Directions
Begin by preheating the oven and lining a baking pan with parchment paper. In a large bowl, cream together the butter, granulated sugar, and brown sugar until light and fluffy. Add the eggs one at a time, mixing well after each addition, then stir in the vanilla extract.
In a separate bowl, whisk together the flour, baking powder, and salt. Gradually add the dry ingredients to the wet mixture, mixing just until combined. Fold in the white chocolate chips and most of the sprinkles, reserving some for the top.
Spread the dough evenly into the prepared pan, smoothing the surface with a spatula. Sprinkle the remaining sprinkles over the top and press them gently into the dough. Bake until the edges are set and lightly golden, while the center remains soft. Allow the bars to cool completely before slicing into squares.
Equipment needed
Must-Have Tools to Get Rolling
Here’s what you’ll want to have on hand:
Silicone Spatula – Durable, heat-resistant silicone spatula perfect for mixing, scraping, and spreading. Gentle on non-stick cookware and easy to clean.
Large pot – You’ll need this to boil the whole cabbage head and soften the leaves.
large bowl –Spacious, durable large bowl ideal for mixing, serving, or food preparation. Made from sturdy material and easy to clean.
Sharp knife – For coring the cabbage and slicing out the thick stem in each leaf. A paring knife works best.
Mixing bowl – A big bowl makes it easier to combine your meat and rice filling evenly.
Cutting board – For prepping cabbage leaves and rolling them like a pro.
9×13-inch baking dish – Ideal size to fit your rolled cabbage leaves snugly and prevent them from unraveling.
knife – A sharp, durable kitchen knife perfect for slicing, chopping, and dicing with ease.
Servings and timing
This recipe makes approximately sixteen cookie bars. Preparation time is about 15 minutes, with a baking time of 25 to 30 minutes. Allow additional time for cooling before cutting.
Storage/reheating
Store Christmas Cookie Bars in an airtight container at room temperature for up to five days. They can also be refrigerated for up to a week. For a freshly baked feel, allow chilled bars to sit at room temperature before serving.
Variations and Customizations
These cookie bars are wonderfully adaptable. You can swap white chocolate chips for milk or dark chocolate, depending on preference. For extra holiday flavor, I have added a pinch of cinnamon or nutmeg to the dough with excellent results. Chopped nuts such as pecans or walnuts add crunch and texture if you enjoy contrast.
If you want a more decadent version, drizzle melted chocolate over the cooled bars or spread a thin layer of frosting on top. You can also customize the sprinkles to match different holidays or occasions, making this recipe useful year-round. These small adjustments allow you to tailor the bars while keeping their soft, chewy appeal.
Nutrition and Dietary Info
Christmas Cookie Bars are a sweet indulgence best enjoyed in moderation. They provide energy from carbohydrates and fats, with small amounts of protein from eggs. Portion control makes them easy to enjoy as part of a balanced holiday spread.
Expert Tips & Customizations
Soft Centers
Avoid overbaking to keep the bars chewy and tender.
Even Baking
Spread the dough evenly to ensure uniform texture.
Clean Cuts
Let the bars cool completely before slicing.
Make Ahead
Bake a day in advance to save time during busy holidays.
FAQs
Can I make these ahead of time?
Yes, they keep well for several days.
Can I freeze cookie bars?
Yes, freeze fully cooled bars for up to two months.
How do I know when they are done?
The edges should be set and lightly golden.
Can I use different sprinkles?
Yes, any festive sprinkles work well.
Are these bars soft or crunchy?
They are soft and chewy with lightly crisp edges.
Can I double the recipe?
Yes, use a larger pan and adjust baking time.
Do I need to chill the dough?
No chilling is required.
Can I add frosting?
Yes, frosting adds extra sweetness.
What pan size works best?
A standard square or rectangular baking pan works well.
Are these kid-friendly?
Yes, they are a favorite with children.
Conclusion
Christmas Cookie Bars combine festive charm with simplicity and rich flavor. Soft, buttery, and full of holiday cheer, they are perfect for sharing, gifting, or enjoying at home. When time is short but homemade treats are a must, this recipe delivers reliable results and joyful bites every single time.
Hungry for more? Visit our website for full recipes and follow us on Pinterest for daily foodie inspo you’ll love to pin!